MCP Server
The Model Context Protocol (MCP) is the most powerful way to connect Q to your development tools. Any tool that supports MCP can talk directly to your Q project - accessing your projects, and all connected product context in real time. Never re-explain your vision!
MCP is an open protocol that standardizes how AI tools communicate with external data sources. If you are interested to learn more check out the official Model Context Protocol docs.
Two HeyQ MCP servers. This page covers the authenticated project MCP,
scoped to one HeyQ project and required for real project access (brief, scope,
decisions, missions, roadmap). HeyQ also offers a public onboarding MCP at
https://heyq.com/mcp — unauthenticated, used by the HeyQ marketplace plugins
to give AI tools an install-and-go starting point. If you arrived here after
installing a plugin from the Cursor or Claude Code marketplace, you currently
have the public server. Generate a token below to add the project server
alongside it. See Public MCP below for details.
How It Works
When you connect an MCP client (like Cursor, Claude Desktop, or any other MCP-compatible tool) to Q's MCP server, the tool gains access to a set of tools and resources that let it:
- Read your Projects - traverse files, their content, links, and hierarchy
- Access your Mission Board - understand current missions, tasks, and priorities
- Query project context - ask structured questions about your product
- Create and update content - add ideas, update missions, and more
Q exposes your project data only to the extent chosen. Meaning: You choose which files an MCP Token gets access to. You can create multiple tokens for different services so that these services get only the access needed!
Setup
Create an MCP token
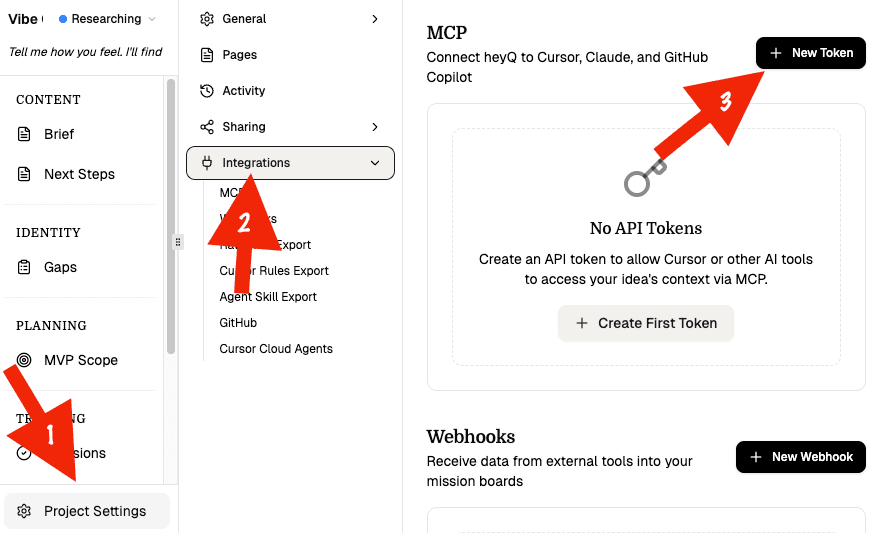
In your workspace, open the relevant project, go to the Project Settings (bottom of the file tree on the left), click on "Integrations" and then click on "+ New Token".
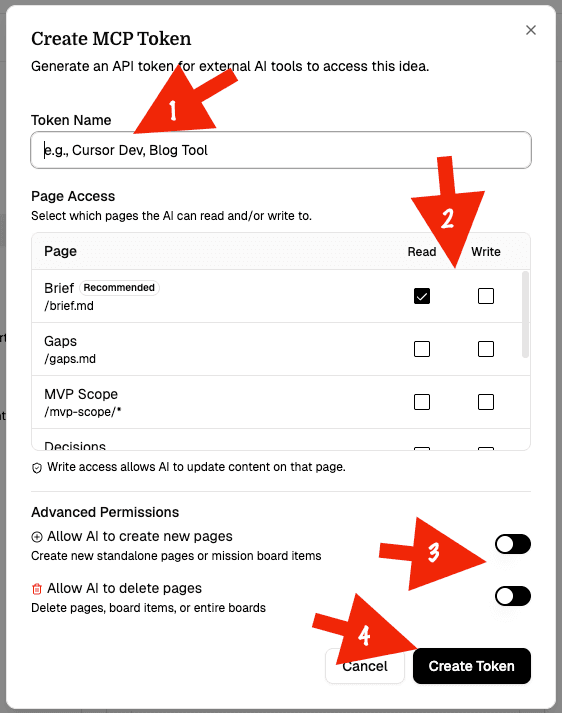
Give the token permissions
In the now opening modal, you can give your token a name, set read/write permissions for any files in your project, decide whether to allow file creation and/or deletion.
Add the MCP server config to your tool of choice
If you use Cursor, just click on the "Add to Cursor" - deeplink. Otherwise, in your tool's MCP configuration, point the server to the provided MCP Server config which looks like the following.
{
  "mcpServers": {
    "Q-Product-Manager-for-YOUR_PROJECT_NAME"
Client-Specific Formats
Different MCP clients expect slightly different config formats. Q currently emits these patterns:
Cursor
{
  "mcpServers": {
    "Q-Product-Manager-for-YOUR_PROJECT_NAME": {
      "url": "https://heyq.com/api/mcp/<idea-id>/mcp",
      "headers": {
        "Authorization": "Bearer <your-mcp-token>"
      }
    }
  }
}
Claude Desktop
{
  "mcpServers": {
    "Q-Product-Manager-for-YOUR_PROJECT_NAME": {
      "command": "npx",
      "args": [
        "mcp-remote",
        "https://heyq.com/api/mcp/<idea-id>/mcp",
        "--header",
        "Authorization:Bearer <your-mcp-token>"
      ]
    }
  }
}
Claude Code CLI
claude mcp add Q-Product-Manager-for-YOUR_PROJECT_NAME --transport http --scope user https://heyq.com/api/mcp/<idea-id>/mcp --header "Authorization: Bearer <your-mcp-token>"Available Tools
The MCP server exposes a small set of focused tools. Some are always available, while write tools depend on the permissions granted when the MCP token was created.
Read Tools
These are always available for any valid MCP token:
| Tool | Description |
|---|---|
listPages() | Lists all accessible pages with metadata. Useful to discover what content the token can see. |
readPage() | Reads a specific page by path. For mission board items, it includes the mission metadata and body content. |
getProjectContext() | Returns all accessible top-level context in one document. |
Write Tools
These are only available if the token has write access:
| Tool | Description |
|---|---|
createPage() | Creates a standalone page or a new mission board item. Q assigns mission numbers automatically. |
updatePage() | Updates a page or mission. |
createOperations() | Creates one or more operations on a mission board to group related missions. |
Delete Tool
This is only available if the token has both write access and delete permission:
| Tool | Description |
|---|---|
deletePage() | Deletes a standalone page, a mission item, or an entire mission board. Deleting a board also deletes its missions. |
The AI is instructed to always call getProjectContext() first when starting
a new session. Then use listPages() and readPage(path) to drill into
specific files or mission items.
Supported Tools
Any tool that implements the MCP client protocol works with Q. For detailed setup instructions, see our walkthroughs:
Cursor Walkthrough
Step-by-step setup for Cursor, including MCP, Rules, and Cloud Agents.
Claude Walkthrough
Connect Q to Claude Desktop or Claude Code via MCP.
Public MCP
HeyQ also exposes an unauthenticated, informational-only MCP server at https://heyq.com/mcp. It exists so AI clients can discover HeyQ through a marketplace / plugin listing without provisioning a token first.
What it does:
- Answers "what is HeyQ?" via a
getQOverviewtool. - Returns step-by-step setup instructions (the same ones on this page) via a
getQSetupInstructionstool.
What it does not do:
- It has no access to any user workspace, project, mission, or decision.
- None of the read/write tools described above are available on this server.
It is safe to leave installed alongside the authenticated project MCP. If the authenticated token ever breaks, the public server gives the AI tool a self-serve path to recover: call getQSetupInstructions and follow the steps.
Install: pick the HeyQ plugin from your client's marketplace, or add this entry manually to your MCP config:
{
  "mcpServers": {
    "heyq": {
      "type": "http",
      "url": "https://heyq.com/mcp"
    }
  }
}
The plugin repository also ships agent skills (heyq-product-truth, heyq-onboarding, heyq-workflow) and Claude Code slash commands — see github.com/heyqdotcom/heyq-ai-integrations.